> ## Documentation Index
> Fetch the complete documentation index at: https://ophel.app/docs/llms.txt
> Use this file to discover all available pages before exploring further.

# Conversation Management: folders, tags, and search

> Organize your AI chat history with color-coded folders, free-form tags, pinning, bulk actions, and flexible export — all synced from the platform sidebar.

export const ShortcutLegend = ({lang = "en"}) => {
  const isZh = lang === "zh";
  return <div className="ophel-shortcut-legend" role="note">
      <div className="ophel-shortcut-legend-title">
        {isZh ? "跨平台按键说明" : "Cross-platform key mapping"}
      </div>
      <div className="ophel-shortcut-legend-body">
        {isZh ? <>
            文档中的快捷键会同时显示 Windows/Linux 与 Mac 写法：
            <code>Ctrl</code> 对应 <code>Command</code>，
            <code>Alt</code> 对应 <code>Option</code>。唯一例外是提示词发送，
            <code>Ctrl+Enter</code> 在 Mac 上也使用 <code>Ctrl+Enter</code>。
          </> : <>
            Shortcuts show both Windows/Linux and Mac keys: <code>Ctrl</code> maps
            to <code>Command</code>, and <code>Alt</code> maps to
            <code>Option</code>. Prompt submit is the only exception:
            <code>Ctrl+Enter</code> remains <code>Ctrl+Enter</code> on Mac.
          </>}
      </div>
    </div>;
};

export const Shortcut = ({combo, mac, sameOnMac = false}) => {
  const keyLabels = {
    arrowup: {
      win: "Up",
      mac: "↑"
    },
    arrowdown: {
      win: "Down",
      mac: "↓"
    },
    arrowleft: {
      win: "Left",
      mac: "←"
    },
    arrowright: {
      win: "Right",
      mac: "→"
    },
    up: {
      win: "Up",
      mac: "↑"
    },
    down: {
      win: "Down",
      mac: "↓"
    },
    left: {
      win: "Left",
      mac: "←"
    },
    right: {
      win: "Right",
      mac: "→"
    },
    esc: {
      win: "Esc",
      mac: "Esc"
    },
    escape: {
      win: "Esc",
      mac: "Esc"
    },
    enter: {
      win: "Enter",
      mac: "Enter"
    },
    shift: {
      win: "Shift",
      mac: "⇧"
    },
    backslash: {
      win: "\\",
      mac: "\\"
    }
  };
  const modifierLabels = {
    ctrl: {
      win: "Ctrl",
      mac: "⌘"
    },
    control: {
      win: "Ctrl",
      mac: "⌘"
    },
    cmd: {
      win: "Ctrl",
      mac: "⌘"
    },
    command: {
      win: "Ctrl",
      mac: "⌘"
    },
    alt: {
      win: "Alt",
      mac: "⌥"
    },
    option: {
      win: "Alt",
      mac: "⌥"
    },
    shift: {
      win: "Shift",
      mac: "⇧"
    }
  };
  const normalizeToken = token => String(token || "").trim();
  const formatKey = (token, platform) => {
    const normalized = normalizeToken(token);
    const key = normalized.toLowerCase();
    const mapped = keyLabels[key];
    if (mapped) return mapped[platform];
    if (normalized.length === 1) return normalized.toUpperCase();
    return normalized;
  };
  const formatCombo = (value, platform) => String(value || "").split("+").map(normalizeToken).filter(Boolean).map(token => {
    const mapped = modifierLabels[token.toLowerCase()];
    return mapped ? mapped[platform] : formatKey(token, platform);
  }).join(platform === "mac" ? "" : "+");
  const windowsLabel = formatCombo(combo, "win");
  const macLabel = sameOnMac ? windowsLabel : mac || formatCombo(combo, "mac");
  const title = windowsLabel === macLabel ? windowsLabel : `Windows/Linux: ${windowsLabel}; Mac: ${macLabel}`;
  return <span className="ophel-shortcut" title={title}>
      <code>{windowsLabel}</code>
      {windowsLabel !== macLabel && <>
          <span className="ophel-shortcut-separator"> / </span>
          <code>{macLabel}</code>
        </>}
    </span>;
};

export const Icon = ({src, alt}) => <img src={typeof window !== "undefined" && typeof src === "string" && src.startsWith("/images/icons/") && (window.location.pathname === "/docs" || window.location.pathname.startsWith("/docs/")) ? `/docs${src}` : src} alt={alt} width="18" height="18" style={{
  display: "inline-block",
  verticalAlign: "-0.2em",
  margin: "0 0.15em"
}} />;

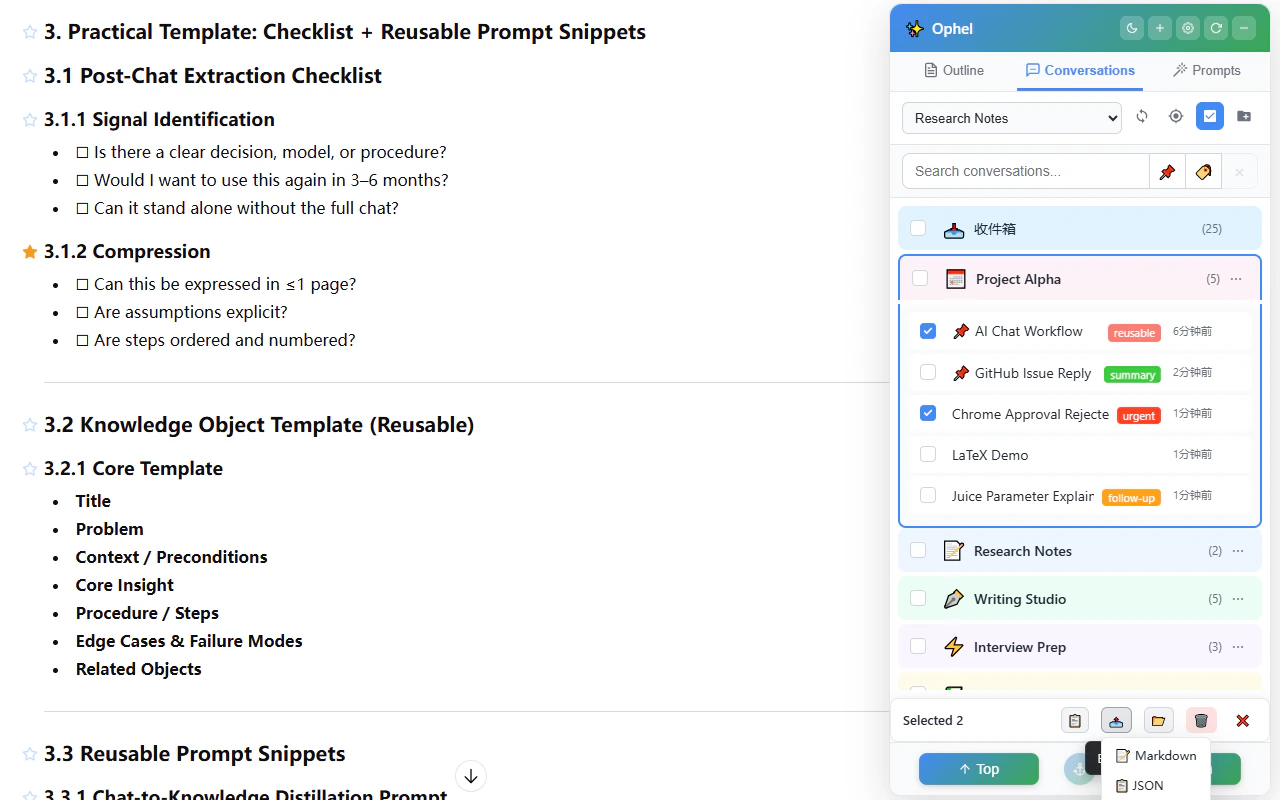
The Conversations tab gives you a searchable, organized view of every chat on the current AI platform.

<img src="https://mintcdn.com/urzeye/9I8m8P8gSndxcYtq/images/features/conversation-en.png?fit=max&auto=format&n=9I8m8P8gSndxcYtq&q=85&s=cb447fe91815933df0f4d066de8ae68f" alt="Conversations tab — folder and tag list" width="1280" height="800" data-path="images/features/conversation-en.png" />

Ophel reads the same conversation list the AI platform displays and layers folders, tags, pinning, and export on top of it — no data leaves the browser unless you explicitly export or sync.

## How conversations sync

Ophel observes the AI platform's sidebar and reflects its conversation list in real time. When you create, rename, or delete a conversation on the platform, the Conversations tab updates automatically. The metadata Ophel adds — folder assignments, tags, pins — is stored locally and overlaid on top of the platform's data.

The folder selector in the upper-left toolbar controls the default folder for new sync results. After you select a folder there, newly discovered conversations are added to that folder by default, whether they are found during manual sync or detected later from the platform sidebar. Existing conversations keep their current folder unless you move them.

## Browsing and filtering

The Conversations tab supports several ways to narrow the list:

* **Search** — type in the search box to filter by title in real time
* **Filter by folder** — click a folder in the sidebar to show only conversations in that folder
* **Filter by tag** — click a tag to show only conversations with that tag
* **Pinned conversations** — pinned items always appear at the top, regardless of any active filter

## Folders

Folders group related conversations with a color-coded label. There are 8 color options. Enable **rainbow colors** in settings to give each folder's conversations a distinct tinted background throughout the list.

A conversation belongs to one folder at a time. Moving it to another folder updates the local Ophel metadata; it does not modify the original conversation content on the AI platform.

You can move conversations in three ways:

* **Quick button group** — click the <Icon src="/docs/images/icons/tools.svg" alt="Toolbox icon" /> toolbox icon in the floating quick button group, then click the <Icon src="/docs/images/icons/folder-move.svg" alt="Move conversation icon" /> **Move Conversation** icon in the popover.
* **Conversation row menu** — in the Conversations tab, click the <Icon src="/docs/images/icons/more-horizontal.svg" alt="Three-dot menu icon" /> three-dot menu on the conversation row, then choose <Icon src="/docs/images/icons/folder-move.svg" alt="Move conversation icon" /> **Move Conversation**.
* **Batch mode** — click the <Icon src="/docs/images/icons/batch.svg" alt="Batch mode icon" /> **Batch Mode** button in the Conversations tab toolbar, select one or more conversations, then click the <Icon src="/docs/images/icons/folder-move.svg" alt="Move conversation icon" /> **Move** button in the batch action bar.

After you choose **Move to folder**, select an existing folder. The folder assignment updates immediately in Ophel metadata and does not modify the original conversation content on the AI platform.

### Drag conversations to folders

Drag any conversation row onto a folder row to move it there. The target folder highlights while you hover over it, and the list updates as soon as you drop.

### Reorder folders

Drag any non-default folder row to reorder your folder list. The default inbox folder stays fixed, and buttons or inputs inside a folder row remain interactive instead of starting a drag.

## Tags

Tags are free-form labels — one conversation can have multiple tags. Use them to mark status (`reviewed`, `todo`), topic (`work`, `study`), or any other dimension that folders do not cover.

* Create and manage tags in **Settings → Features → Conversations**
* Assign tags from <Icon src="/docs/images/icons/tools.svg" alt="Toolbox icon" /> **Toolbox** → <Icon src="/docs/images/icons/tag.svg" alt="Set tag icon" /> **Set Tag**, or from the conversation list context menu
* Filter by tag by clicking the tag in the sidebar

## Pinning conversations

Right-click any conversation, or click the <Icon src="/docs/images/icons/more-horizontal.svg" alt="Three-dot menu icon" /> three-dot menu on its row, then choose <Icon src="/docs/images/icons/pin.svg" alt="Pin icon" /> **Pin** to move it to the top of the list. Pinned rows show a filled pin in the same menu; choose <Icon src="/docs/images/icons/pin.svg" alt="Unpin icon" /> **Unpin** to return the row to normal sorting. Pins persist across sessions.

## Batch operations

Click the <Icon src="/docs/images/icons/batch.svg" alt="Batch mode icon" /> **Batch Mode** button in the Conversations tab toolbar, then select conversations with the row checkboxes. The batch action bar supports:

| Action                                                                         | Description                                           |
| ------------------------------------------------------------------------------ | ----------------------------------------------------- |
| <Icon src="/docs/images/icons/copy.svg" alt="Copy Markdown icon" /> Copy Markdown   | Copy the selected conversation as Markdown            |
| <Icon src="/docs/images/icons/export.svg" alt="Export icon" /> Export               | Export the selected conversation as a file            |
| <Icon src="/docs/images/icons/folder-move.svg" alt="Move conversation icon" /> Move | Assign all selected conversations to a folder at once |
| <Icon src="/docs/images/icons/delete.svg" alt="Delete icon" /> Delete               | Remove all selected conversations                     |
| <Icon src="/docs/images/icons/clear.svg" alt="Exit batch mode icon" /> Exit         | Leave batch mode and clear the current selection      |

## Exporting a conversation

You can export a conversation in three ways:

* **Quick button group** — click the <Icon src="/docs/images/icons/tools.svg" alt="Toolbox icon" /> toolbox icon in the floating quick button group, then click <Icon src="/docs/images/icons/export.svg" alt="Export icon" /> **Export** to export <Icon src="/docs/images/icons/markdown.svg" alt="Markdown file icon" /> Markdown.
* **Keyboard shortcut** — press <Shortcut combo="ctrl+shift+e" /> to export the current conversation as <Icon src="/docs/images/icons/markdown.svg" alt="Markdown file icon" /> Markdown.
* **Conversation row menu** — in the Conversations tab, click the <Icon src="/docs/images/icons/more-horizontal.svg" alt="Three-dot menu icon" /> three-dot menu on a conversation row, choose <Icon src="/docs/images/icons/export.svg" alt="Export icon" /> **Export**, then select <Icon src="/docs/images/icons/markdown.svg" alt="Markdown file icon" /> Markdown, <Icon src="/docs/images/icons/json-file.svg" alt="JSON file icon" /> JSON, or <Icon src="/docs/images/icons/txt-file.svg" alt="TXT file icon" /> TXT.

Markdown exports can optionally be delivered as a zip package that includes images, attachments, and other assets referenced in the conversation.

You can also click <Icon src="/docs/images/icons/tools.svg" alt="Toolbox icon" /> **Toolbox** → <Icon src="/docs/images/icons/copy.svg" alt="Copy Markdown icon" /> **Copy Markdown** to copy the entire conversation to your clipboard without saving a file.

For full details on export formats, packaging modes, asset handling, and per-platform capabilities, see the dedicated [Export & Packaging](/docs/features/export) page.

## Keyboard shortcuts

<ShortcutLegend />

| Shortcut                          | Action                              |
| --------------------------------- | ----------------------------------- |
| <Shortcut combo="ctrl+shift+o" /> | New conversation                    |
| <Shortcut combo="alt+shift+r" />  | Refresh conversation list           |
| <Shortcut combo="alt+shift+l" />  | Locate current conversation in list |
| <Shortcut combo="alt+[" />        | Previous conversation               |
| <Shortcut combo="alt+]" />        | Next conversation                   |
| <Shortcut combo="ctrl+shift+e" /> | Export current conversation         |
| <Shortcut combo="ctrl+shift+c" /> | Copy latest AI reply                |

All shortcuts are customizable in **Settings → Shortcuts**.

## WebDAV sync

Configure a WebDAV server in **Settings → Sync & Backup → WebDAV** to sync Ophel's **conversation metadata** to your own private server.

<Note>
  WebDAV sync transfers only the metadata Ophel stores locally — folder
  assignments, tags, and pin state. It does not include the actual AI
  conversation content, which belongs to the AI platform.
</Note>

Both manual sync (click the button) and automatic sync at a set interval are supported. See [WebDAV Sync](/docs/data/webdav) for full setup instructions.

## Settings

Go to **Settings → Features → Conversations** to configure folder and sync behavior.

| Setting               | Description                                                        |
| --------------------- | ------------------------------------------------------------------ |
| Folder rainbow colors | Use distinct colored backgrounds for folder-assigned conversations |
| Auto unpin on sync    | Remove pins when syncing from a remote source                      |
| Sync delete to cloud  | Delete remote records when you delete conversations locally        |
