> ## Documentation Index
> Fetch the complete documentation index at: https://ophel.app/docs/llms.txt
> Use this file to discover all available pages before exploring further.

# Prompt Library: build and reuse your prompt templates

> Save prompts with variable placeholders, organize them by category, insert with one click or queue multiple prompts for automatic sequential sending.

export const ShortcutLegend = ({lang = "en"}) => {
  const isZh = lang === "zh";
  return <div className="ophel-shortcut-legend" role="note">
      <div className="ophel-shortcut-legend-title">
        {isZh ? "跨平台按键说明" : "Cross-platform key mapping"}
      </div>
      <div className="ophel-shortcut-legend-body">
        {isZh ? <>
            文档中的快捷键会同时显示 Windows/Linux 与 Mac 写法：
            <code>Ctrl</code> 对应 <code>Command</code>，
            <code>Alt</code> 对应 <code>Option</code>。唯一例外是提示词发送，
            <code>Ctrl+Enter</code> 在 Mac 上也使用 <code>Ctrl+Enter</code>。
          </> : <>
            Shortcuts show both Windows/Linux and Mac keys: <code>Ctrl</code> maps
            to <code>Command</code>, and <code>Alt</code> maps to
            <code>Option</code>. Prompt submit is the only exception:
            <code>Ctrl+Enter</code> remains <code>Ctrl+Enter</code> on Mac.
          </>}
      </div>
    </div>;
};

export const Shortcut = ({combo, mac, sameOnMac = false}) => {
  const keyLabels = {
    arrowup: {
      win: "Up",
      mac: "↑"
    },
    arrowdown: {
      win: "Down",
      mac: "↓"
    },
    arrowleft: {
      win: "Left",
      mac: "←"
    },
    arrowright: {
      win: "Right",
      mac: "→"
    },
    up: {
      win: "Up",
      mac: "↑"
    },
    down: {
      win: "Down",
      mac: "↓"
    },
    left: {
      win: "Left",
      mac: "←"
    },
    right: {
      win: "Right",
      mac: "→"
    },
    esc: {
      win: "Esc",
      mac: "Esc"
    },
    escape: {
      win: "Esc",
      mac: "Esc"
    },
    enter: {
      win: "Enter",
      mac: "Enter"
    },
    shift: {
      win: "Shift",
      mac: "⇧"
    },
    backslash: {
      win: "\\",
      mac: "\\"
    }
  };
  const modifierLabels = {
    ctrl: {
      win: "Ctrl",
      mac: "⌘"
    },
    control: {
      win: "Ctrl",
      mac: "⌘"
    },
    cmd: {
      win: "Ctrl",
      mac: "⌘"
    },
    command: {
      win: "Ctrl",
      mac: "⌘"
    },
    alt: {
      win: "Alt",
      mac: "⌥"
    },
    option: {
      win: "Alt",
      mac: "⌥"
    },
    shift: {
      win: "Shift",
      mac: "⇧"
    }
  };
  const normalizeToken = token => String(token || "").trim();
  const formatKey = (token, platform) => {
    const normalized = normalizeToken(token);
    const key = normalized.toLowerCase();
    const mapped = keyLabels[key];
    if (mapped) return mapped[platform];
    if (normalized.length === 1) return normalized.toUpperCase();
    return normalized;
  };
  const formatCombo = (value, platform) => String(value || "").split("+").map(normalizeToken).filter(Boolean).map(token => {
    const mapped = modifierLabels[token.toLowerCase()];
    return mapped ? mapped[platform] : formatKey(token, platform);
  }).join(platform === "mac" ? "" : "+");
  const windowsLabel = formatCombo(combo, "win");
  const macLabel = sameOnMac ? windowsLabel : mac || formatCombo(combo, "mac");
  const title = windowsLabel === macLabel ? windowsLabel : `Windows/Linux: ${windowsLabel}; Mac: ${macLabel}`;
  return <span className="ophel-shortcut" title={title}>
      <code>{windowsLabel}</code>
      {windowsLabel !== macLabel && <>
          <span className="ophel-shortcut-separator"> / </span>
          <code>{macLabel}</code>
        </>}
    </span>;
};

export const Icon = ({src, alt}) => <img src={typeof window !== "undefined" && typeof src === "string" && src.startsWith("/images/icons/") && (window.location.pathname === "/docs" || window.location.pathname.startsWith("/docs/")) ? `/docs${src}` : src} alt={alt} width="18" height="18" style={{
  display: "inline-block",
  verticalAlign: "-0.2em",
  margin: "0 0.15em"
}} />;

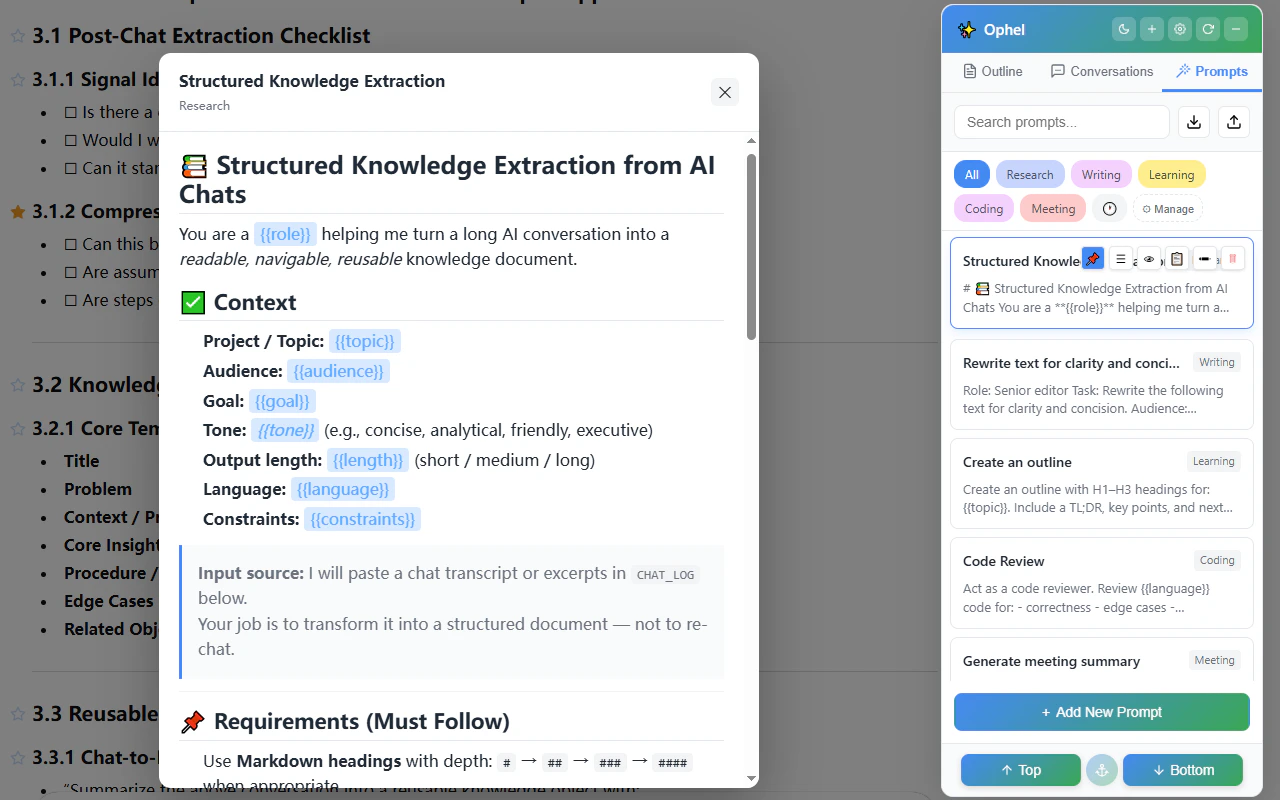
The Prompt Library saves you from retyping the same instructions every session. You build a personal collection of prompt templates, organize them into categories, and insert any prompt into the AI input box with a single click. Variables let you write reusable templates where certain values are filled in at send time.

<img src="https://mintcdn.com/urzeye/9I8m8P8gSndxcYtq/images/features/prompt-en.png?fit=max&auto=format&n=9I8m8P8gSndxcYtq&q=85&s=6c6fe5fef8140153b8c2824c4e3666b1" alt="Prompt Library — prompt list and categories" width="1280" height="800" data-path="images/features/prompt-en.png" />

## Using a prompt

<Tabs>
  <Tab title="Single click">
    Inserts the prompt text into the AI input box but does not submit. You can
    review or edit the content before sending.
  </Tab>

  <Tab title="Double-click">
    Inserts and submits immediately. If the AI is already generating and
    **Prompt Queue** is enabled, Ophel adds the prompt to the queue instead of
    interrupting the current reply. You can turn double-click sending off in
    **Settings → Features → Prompts** if you always want to review before
    sending.
  </Tab>
</Tabs>

If the prompt contains variables, a dialog appears first asking you to fill in each value before the text is inserted.

## Creating prompts

Click the <Icon src="/docs/images/icons/prompt.svg" alt="Add prompt icon" /> **+ Add Prompt** button at the bottom of the Prompts tab and fill in the following fields:

| Field    | Description                                                                                            |
| -------- | ------------------------------------------------------------------------------------------------------ |
| Title    | A short label shown in the list                                                                        |
| Content  | The full prompt text; variables can be embedded anywhere                                               |
| Category | Optional group label to keep related prompts together (e.g., "Writing", "Coding")                      |
| Pin      | Optional; <Icon src="/docs/images/icons/pin.svg" alt="Pin icon" /> keeps this prompt at the top of the list |

The prompt appears in the list immediately after saving. Hover over a prompt row to use <Icon src="/docs/images/icons/pin.svg" alt="Pin icon" /> pin, <Icon src="/docs/images/icons/eye.svg" alt="Preview icon" /> preview, <Icon src="/docs/images/icons/copy.svg" alt="Copy icon" /> copy, <Icon src="/docs/images/icons/more-horizontal.svg" alt="More menu icon" /> more, <Icon src="/docs/images/icons/edit.svg" alt="Edit icon" /> edit, or <Icon src="/docs/images/icons/delete.svg" alt="Delete icon" /> delete.

## Variables

Variables let you write a reusable template where certain values are filled in when you use the prompt. The syntax is **double curly braces**: `{{variable_name}}`.

When you click a prompt containing variables, a dialog pops up with an input for each one. Fill in the values and press Enter or click **Confirm** to insert the filled text.

There are three variable sub-types:

<AccordionGroup>
  <Accordion title="Basic variable">
    A plain variable name inside double curly braces. The dialog shows an empty text input.

    ```text theme={}
    Summarize the following text in {{language}}:

    {{content}}
    ```
  </Accordion>

  <Accordion title="Variable with a default value">
    Add a colon (`:`) after the variable name, followed by the default. The dialog pre-fills the input with that value — press Enter to accept it unchanged.

    ```text theme={}
    Translate to {{target_language:English}}:

    {{text}}
    ```
  </Accordion>

  <Accordion title="Variable with dropdown options">
    Add a colon after the variable name, then list options separated by pipe characters (`|`). The dialog shows a dropdown menu instead of a text field.

    ```text theme={}
    Rewrite this in a {{tone:formal|casual|humorous}} tone.
    ```

    You can list as many options as you need:

    ```text theme={}
    Code review for {{language:TypeScript|Python|Go|Rust|Java}}
    ```
  </Accordion>
</AccordionGroup>

Variables of any sub-type can be mixed in the same prompt. The variable name is the text before the colon, or the entire content between `{{` and `}}` if there is no colon.

## Categories

Assign prompts to categories to keep your library organized. A category sidebar appears on the Prompts tab — click a category name to filter the list to that group. Categories are created automatically when you type a new name while editing a prompt.

## Pins

Click the <Icon src="/docs/images/icons/pin.svg" alt="Pin icon" /> pin icon on any prompt to float it to the top of the list. Pinned prompts always appear before unpinned ones, regardless of the active category filter.

## Sorting and search

Use the <Icon src="/docs/images/icons/search.svg" alt="Search icon" /> search box at the top of the Prompts tab to filter by title or content in real time. Pinned prompts always stay at the top of sorted results.

Drag any prompt row to reorder your library. Buttons, inputs, menus, and other interactive controls inside a row remain clickable and do not start a drag.

## Import and export

Click the <Icon src="/docs/images/icons/import.svg" alt="Import and export menu icon" /> import/export button in the Prompts tab toolbar, then choose <Icon src="/docs/images/icons/export.svg" alt="Export icon" /> **Export** to save your entire prompt library to a JSON file. This is useful for backup or transferring to another device.

Choose <Icon src="/docs/images/icons/import.svg" alt="Import icon" /> **Import** from the same menu to read a JSON file back and pick one of three merge options:

| Option      | Behavior                                                                     |
| ----------- | ---------------------------------------------------------------------------- |
| Add new     | Imports only prompts whose title does not already exist — skips duplicates   |
| Overwrite   | Imports all prompts; replaces existing prompts that share the same title     |
| Replace all | Deletes your current library and replaces it entirely with the imported file |

## <Icon src="/docs/images/icons/prompt-queue.svg" alt="Prompt Queue icon" /> Prompt Queue

The Prompt Queue lets you line up multiple prompts and send them automatically one after another. Ophel waits for the AI to finish each response before sending the next — you do not have to watch and click each time. This is useful for multi-step workflows, batch tasks, or structured interview sequences.

### Enabling the Queue

Go to <Icon src="/docs/images/icons/settings.svg" alt="Settings icon" /> **Settings → Features → Prompts → Prompt Queue** and toggle it on. A <Icon src="/docs/images/icons/prompt-queue.svg" alt="Prompt Queue icon" /> queue widget appears near the AI input box. Show or hide it at any time with the **Toggle Prompt Queue** shortcut (default: <Icon src="/docs/images/icons/keyboard.svg" alt="Keyboard shortcut icon" /> <Shortcut combo="alt+j" />).

### Adding prompts to the Queue

Type directly in the queue input field and press **Enter** to add a prompt. The queue displays a numbered list of pending items.

You can also add saved prompts from the Prompt Library:

| Source                                                                                                                                                                                                          | Behavior                                                                          |
| --------------------------------------------------------------------------------------------------------------------------------------------------------------------------------------------------------------- | --------------------------------------------------------------------------------- |
| <Icon src="/docs/images/icons/more-horizontal.svg" alt="More menu icon" /> Prompt More menu → <Icon src="/docs/images/icons/add-to-queue.svg" alt="Add to queue icon" /> **Add to queue**                                 | Adds the selected prompt as one queue item                                        |
| <Icon src="/docs/images/icons/more-horizontal.svg" alt="More menu icon" /> Prompt More menu → <Icon src="/docs/images/icons/split-lines-to-queue.svg" alt="Split lines to queue icon" /> **Split lines and add to queue** | Splits the prompt content by line and adds each non-empty line as a separate item |
| Double-click a prompt while the AI is generating                                                                                                                                                                | Queues the prompt automatically when Prompt Queue is enabled                      |

Variable prompts open the variable dialog first when you add them from the prompt row menu. After you confirm the variables, the resolved prompt is added to the queue.

For adding many prompts at once, click the <Icon src="/docs/images/icons/import.svg" alt="Batch add icon" /> **Batch Add** button in the queue panel. The dialog has two sources:

<Tabs>
  <Tab title="Prompt Library">
    Select saved prompts directly from your library. Choose **Each prompt as one
    item** or **Split by line**. Prompts that still require variables are
    disabled in this batch picker; open them from the Prompts tab first so you
    can fill the variables.
  </Tab>

  <Tab title="Text">Paste a block of text and choose a split mode:</Tab>
</Tabs>

| Split mode         | Behavior                                                                             |
| ------------------ | ------------------------------------------------------------------------------------ |
| Split by line      | Each line becomes one prompt; empty lines are ignored                                |
| Split by delimiter | Enter a custom separator string (e.g., `---`) and the text splits at each occurrence |

A preview shows exactly how the text will be divided before you confirm.

### Running the Queue

<Steps>
  <Step title="Add one or more prompts">
    Add prompts from the queue input, the <Icon src="/docs/images/icons/more-horizontal.svg" alt="More menu icon" /> prompt row menu, or the <Icon src="/docs/images/icons/import.svg" alt="Batch add icon" /> Batch Add dialog.
  </Step>

  <Step title="Ophel sends prompts automatically">
    If the AI is idle, Ophel starts with the next queued prompt immediately. If
    the AI is generating, pending prompts wait in the queue until the page is
    idle.
  </Step>

  <Step title="Manage the queue while it runs">
    You can edit a pending item, force-send a single item, remove individual
    items, or clear the queue with <Icon src="/docs/images/icons/cleanup.svg" alt="Clear queue icon" /> **Clear Queue**.
  </Step>
</Steps>

## Prompt Chains

Prompt chains let you select text from any part of the conversation and trigger a sequence of prompts that reference that selection. When you select text on the page, a lightweight popover appears with built-in actions and any custom chains you've created.

### What are chains?

A **chain** is a sequence of prompts that run one after another. Each step in the chain can reference the selected text using special variables:

* `{{selection}}` — The raw selected text
* `{{quote}}` — The selected text formatted as a Markdown blockquote

Chains are useful for multi-step workflows like:

* Select a passage, summarize it, then ask a follow-up question
* Select code, explain it, then suggest improvements
* Select text, translate it, then rewrite in a different tone

### Creating a chain

<Steps>
  <Step title="Open the Chains view">
    In the Prompts tab, click <Icon src="/docs/images/icons/chain.svg" alt="Chains icon" /> **Chains** at the top to switch from the Prompts list to the Chains view.
  </Step>

  <Step title="Click Add Chain">
    Click the <Icon src="/docs/images/icons/prompt.svg" alt="Add chain icon" /> **+ Add Chain** button and fill in:

    * **Name** — A short label for this chain
    * **Description** — What the chain does (optional)
    * **Icon** — Pick from 40+ preset SVG icons, or leave blank
    * **Show in selection popover** — Toggle whether this chain appears when you select text
  </Step>

  <Step title="Add prompt steps">
    Click **Add step** to add prompts to the chain. Each step can either:

    * Reference an existing prompt from your library (recommended)
    * Use inline text directly (for one-off chains)

    Steps run in order from top to bottom. Drag steps to reorder them.
  </Step>

  <Step title="Preview variables">
    The editor shows which variables your chain uses. Built-in variables like `{{selection}}` and `{{quote}}` are filled automatically. Any other variables prompt you for input when you run the chain.
  </Step>

  <Step title="Save">
    Click **Save** to add the chain to your library.
  </Step>
</Steps>

### Using a chain

<Tabs>
  <Tab title="From selection popover">
    Select text anywhere in the conversation. A popover appears with **Copy**, **Quote**, and your enabled chain icons. Click a chain icon to trigger it. If the chain has variables, a dialog prompts you to fill them in first.
  </Tab>

  <Tab title="From the Chains list">
    Click a chain card in the Chains view to execute it. If you haven't selected text first, the chain will use empty values for `{{selection}}` and `{{quote}}`.
  </Tab>
</Tabs>

When a chain runs:

1. All variables are resolved (either automatically from the selection, or by prompting you)
2. Each step is added to the Prompt Queue in order
3. The queue sends each prompt one at a time, waiting for the AI to finish before sending the next

<Note>
  Chains require the **Prompt Queue** feature to be enabled. If you try to run a multi-step chain without it, Ophel will prompt you to turn it on.
</Note>

### Chain management

Chains appear as cards in the Chains view. Each card shows:

* The chain icon and name
* Number of steps
* Whether it's shown in the selection popover
* Enable/disable toggle

Click a chain card to execute it. Hover over a chain card to reveal:

| Action                                                           | Description                                               |
| ---------------------------------------------------------------- | --------------------------------------------------------- |
| <Icon src="/docs/images/icons/edit.svg" alt="Edit icon" /> Edit       | Opens the chain editor to modify steps, icon, or settings |
| <Icon src="/docs/images/icons/copy.svg" alt="Copy icon" /> Duplicate  | Creates a copy of the chain                               |
| <Icon src="/docs/images/icons/delete.svg" alt="Delete icon" /> Delete | Removes the chain permanently                             |

Chains are included in prompt backups and WebDAV sync.

### Built-in actions

Two actions are always available in the selection popover:

* **Copy** — Copies the selected text to your clipboard
* **Quote** — Inserts the selected text as a blockquote into the input box, letting you add context before sending

A default **Quote Reply** chain is also included, which inserts "Reply based on the quoted text below:" followed by the quoted selection.

## Settings

Go to **Settings → Features → Prompts** to configure:

| Setting                                                                            | Description                                                                                           |
| ---------------------------------------------------------------------------------- | ----------------------------------------------------------------------------------------------------- |
| Double-click to send                                                               | Double-clicking a prompt inserts and submits it directly                                              |
| Submit key                                                                         | Key used to submit to the AI after insertion — **Enter** or <Shortcut combo="ctrl+enter" sameOnMac /> |
| <Icon src="/docs/images/icons/prompt-queue.svg" alt="Prompt Queue icon" /> Prompt queue | Enable or disable the queue overlay feature                                                           |
| Selection quote                                                                    | Enable or disable the selection popover for chains and quick actions                                  |

## Example templates

Here are some ready-to-use prompt templates that demonstrate variable syntax. Copy any of them directly into a new prompt.

<AccordionGroup>
  <Accordion title="Translation with language selector">
    ```text theme={}
    Translate the following text into {{target_language:English|Chinese|Japanese|French|Spanish|German}}. Keep the original formatting.

    {{text}}
    ```
  </Accordion>

  <Accordion title="Code review with language choice">
    ````text theme={}
    Review the following {{language:TypeScript|Python|Go|Rust|Java}} code. Focus on: readability, potential bugs, and performance. Output your findings in bullet points.

    ```{{language}}
    {{code}}
    ````

    ````

    </Accordion>
    <Accordion title="Tone rewriter">
    ```text
    Rewrite the following text in a {{tone:professional|casual|concise|detailed|humorous}} tone. Preserve the core meaning.

    {{text}}
    ````
  </Accordion>

  <Accordion title="Meeting summary">
    ```text theme={}
    Summarize the following meeting notes into:
    1. Key decisions
    2. Action items (with owner if mentioned)
    3. Open questions

    Meeting: {{meeting_title}}
    Date: {{date}}

    Notes:
    {{notes}}
    ```
  </Accordion>
</AccordionGroup>
